
Guide
Window capture vs display capture for Mac gameplay clips
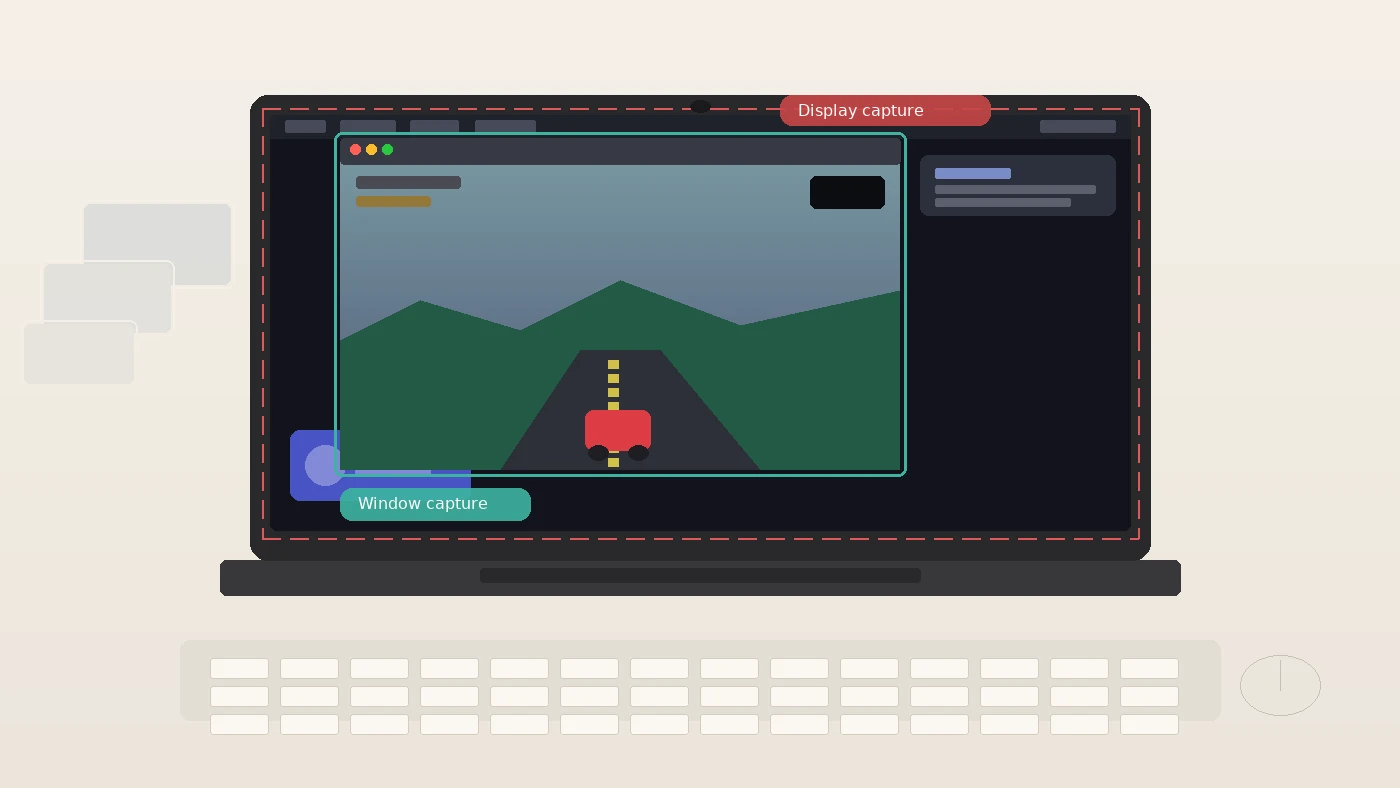
Most Mac recording tools start you on the whole screen. That is the easy default, and for a desktop walkthrough it is often the right one. For a gameplay clip it is usually the wrong one: the menu bar, a Slack toast, a Discord overlay, and the second monitor you forgot about all end up in the file. The fix is not a better crop afterwards. It is choosing the capture target before you record.
What display capture actually grabs
A display capture records a monitor: every pixel that monitor is showing, including chrome that is not part of the game. Apple's Screenshot and QuickTime screen recording still centres on Record Entire Screen or a selected portion of the desktop. On macOS Tahoe 26 or later the toolbar also offers Record Selected Window, which is a welcome addition — but many guides, and many third-party tools, still default to the full display because that is the historically simple path.
Display capture is honest about what it is. If Discord is floating over the game, it is in the recording. If a calendar reminder pops while you clutch, it is in the recording. If you play on one screen and keep chat on another, a whole-display capture of the wrong monitor is an empty file. None of that is a bug in the recorder; it is the definition of capturing a display.
What window capture does differently
ScreenCaptureKit can filter to a single window (or a set of windows and apps) instead of a whole display. Apple's SCContentFilter API is explicit about that choice: you either target a display, or you target a window — including a desktop-independent window that follows the app as you drag it between screens.
That filter is what makes clean game clips possible on a busy desktop. The menu bar stays out. Notifications stay out. Other monitors stay out. And because the stream is tied to one application, ScreenCaptureKit can deliver that application's audio without the rest of the system mix — the same mechanism covered in how to record game audio without Discord. Window capture is not only a framing choice; on modern macOS it is also the path to per-app sound.
When display capture is still the right tool
Prefer the whole display when the desktop is the subject:
- Multi-window tutorials where the viewer needs to see Finder, a browser, and the game together.
- Desktop demos, settings walkthroughs, or anything that jumps between apps.
- Moments where Discord callouts or on-screen chat are part of the story you want to keep.
In those cases, cropping later is fighting the recording. Capture the display on purpose, and accept that everything visible is part of the take.
When window capture is the better default for clips
Prefer a single window when you want a shareable game moment:
- Clean gameplay clips without desktop junk.
- Discord-safe audio — game sound in, call out of the file unless you choose otherwise.
- Fullscreen or borderless games where you still want the buffer to track that one app.
- Rolling-buffer / instant-replay workflows, where the buffer should hold the game, not your email.
That last point matters more than it sounds. A rolling buffer is only useful if what it held was the thing you meant to save. Filling thirty seconds of memory with a menu bar and a notification is wasted history.
How this shows up in Steam, OBS, and built-in tools
The same distinction appears under different names elsewhere. OBS lets you add a Display Capture or a Window Capture source; for Mac gameplay clips the window source is usually the one that matches the intent. Steam Game Recording is aimed at the game Steam launched, which is closer in spirit to a game-scoped capture than to a desktop grab — with the structural limit that it only knows about Steam titles. For a broader comparison of those options, see how to clip gameplay on a Mac and how to record the last 30 seconds.
Hindsight is built around the window path on purpose: a rolling buffer of one game window, saved after the moment, with optional game-only audio. That is not the only honest answer on a Mac, but it is the answer when the job is “clip what just happened in this game” rather than “film my entire desktop.”
A quick way to choose
- Is the desktop part of the story? Display capture.
- Is the game the only thing you want in the file? Window capture.
- Do you need the game's audio without Discord? Window capture with app audio — not a display grab of the speaker mix.
- Are you saving something that already happened? Pair window capture with a rolling buffer, not with Shift-Command-5 after the fact.
If you only change one habit after reading this, make it the capture target. Resolution, bitrate, and encoder matter. Recording the wrong surface wastes all three.